How to get Django and ReactJS to work together?

Django is a popular backend web framework where it promises its users to provide robust and secure performance. On the other hand, React is today’s top endorsed frontend framework. To create a fully functional web application for the users it is required that both frontend and backend work together. In our case, it is Django-react that can provide us with a smooth experience with strong security. For that, we need to know how to create this bridge between Django and react. To get started we need to install both Django and react.
In case you haven’t installed Django yet and have python installed you can easily install Django by the following command.
pip install Django
After successfully installing Django on your computer you can now follow the following steps to create your first Django-react web application.
1. Create a Django project
First, you need to create a folder where you want to build the project. Then navigate to the directory you created and run the following command
django-admin startproject ‘project-name’
After running this command your Django project will be created into your selected folder. You need to give your own project name in the ‘project-name’ area.
2. Create the react app
Make sure that you have node.js installed on your computer. You can download node.js from here https://nodejs.org/en/download/. Now you can create the react app easily just by the following command.
npx create-react-app ‘app-name’
Don’t forget to give your own desired app-name in the ‘app-name’ area. It will take just a few moments to create the app. Then you can navigate to that folder that is created upon running that command and type ‘npm start’ in the terminal to start.
3. Drag react app folder into Django project
Once our Django project and react app are created we can now just drag or copy-paste the entire react app folder into the Django project’s main directory. Then we need to run another command into the react app which is
npm run build
It will create a build directory with a production build into our app. After that our Django folder structure will look something like this.
4. Configure templates engine and url path in Django
Now in settings.py of the Django project’s root or main directory, you need to go to templates and then inside the ‘DIRS’:[ ]. Initially, this ‘DIRS’ list will be empty. Now here you need to add this line of code.
os.path.join(BASE_DIR, ‘“your-app-name”/build’)
Here in the area “your app name” you need to put your own react app’s name. In my case, I created an app named ‘reactapp’. So my templates list looks like this.

Now in urls.py of Django project’s root or main directory, we need to configure the URL as well. We need to import the template view at the beginning of urls.py.
from django.views.generic import TemplateView

You can put this snippet at the beginning of your urls.py.After that in the URL patterns list, you need to include this path as well.
path('', TemplateView.as_view(template_name='index.html'))

5. Configure the static files
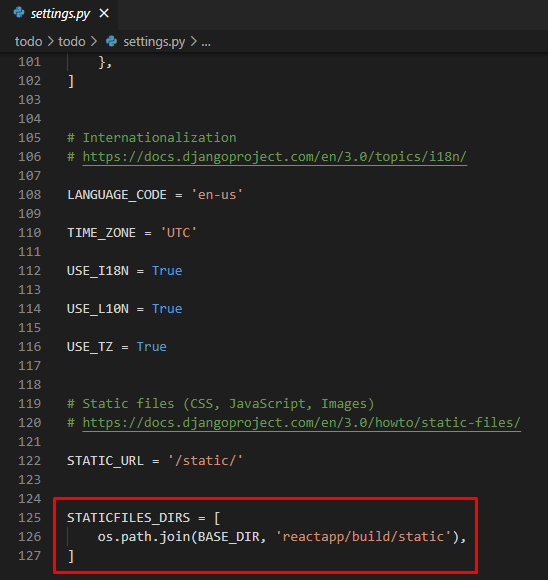
Now again we need to configure the static files in settings.py of Django to connect to the static folder of react app.
STATICFILES_DIRS = [os.path.join(BASE_DIR, '”your-app-name”/build/static')]
You can put the above snippet in your settings.py. Don’t forget to put your own react app name in the “your-app-name” area.

6. Start your Django app server
Now you can start your Django server and your default react template will be rendered in the browser. In case you don't know how to start a Django server, you can run the following command in the Django project through the terminal.
python manage.py runserver
Now you will be able to see the react default template instead of the Django template in your browser that is coming through Django.
By following these steps you can now integrate your Django and react app. You will also be able to make the necessary changes in your react app and it will be reflected on the browser as well.